Default walpaper setting
inMethod 1:using the Local Group Policy Editor
The Group Policy is a Windows feature that controls the working environment of the operating system. It contains many settings that are not available in the Control Panel or Settings app. There is a specific policy that can set a desktop wallpaper for all the users on the system. Once the policy setting is configured in the Group Policy Editor, it will automatically update the Registry Editor for this specific setting.
method 2:
In the Local Group Policy Editor window, go to the following path:
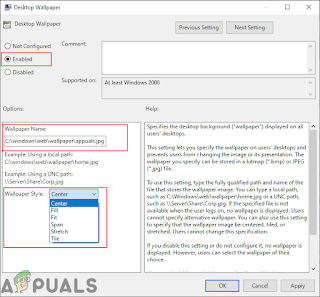
Now double-click on the policy named “Desktop Wallpaper” and it will open another window. Then choose the Enable toggle option and provide the wallpaper path. You can also choose the Wallpaper Style from any of the available options.
Note: The wallpaper must be a JPG format. It should be located in “C:\windows\web\wallpaper\“. For some users, it doesn’t work if the image is located in a directory that is not accessible for them.
After that, click on the Apply and Ok buttons to save these changes.
Most of the time the Group Policy will automatically update the changes. If not, then you need to force the update for the group policy.
Search for Command Prompt in the Windows search feature and run it as an administrator. Now type the following command in Command Prompt (Admin) and press the Enter key. You can also do this by simply restarting the system.
First, open the Run dialog box by pressing the Windows and R keys together on your keyboard. Then, you need to type “regedit” in the box and press the Enter key to open the Registry Editor. If prompted by the UAC (User Account Control) prompt, then click on the Yes button.
To create a Registry backup before making new changes, click on the File menu and choose the Export option. Select the path and name the file as you want. Finally, click on the Save button to create a Registry backup.
Double-click on the Wallpaper value and it will open a small dialog. Now add the path of the image that you want to use for wallpaper.
You can also create another string value by right-clicking on the right pane and choosing the New > String Value option. This one should be named “WallpaperStyle“.
Double-click on the WallpaperStyle Value to open it. Now change the value data accordingly. The value data 0 is for the Center, 1 is for Tile, 2 is for Stretch, 3 is for Fit, 4 is for Fill, and value data 5 is for Span style.
Finally, close the Registry Editor window, and restart the system to apply these new changes.


Comments
Post a Comment